
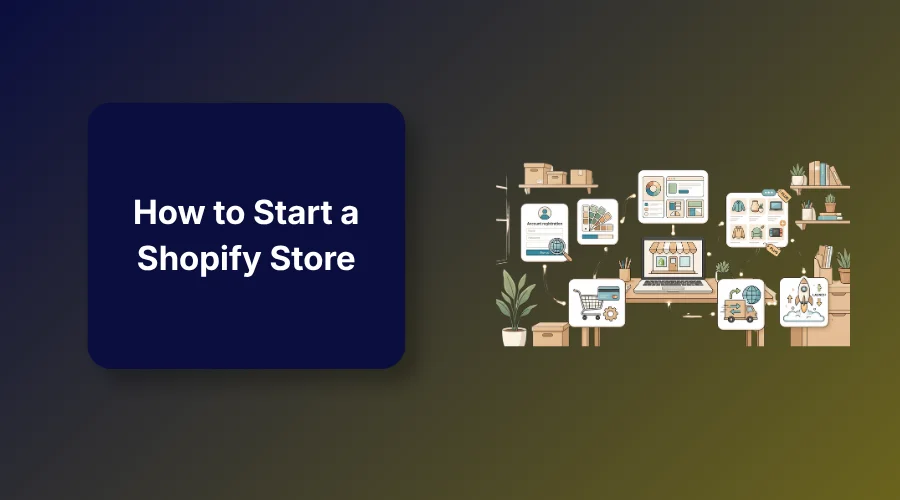
You can learn how to start a Shopify store in a few simple steps. First, create an account, pick a store name, and choose a theme. Next, add your products, set up payments, configure shipping, test the checkout, and launch.
Do you want to know how to start a Shopify store? You can build and launch your online shop today. You do not need technical skills or coding experience.
I know it can feel scary at first when you think about starting an ecommerce business. Many new sellers get confused by technical terms. You might worry about costs or choosing the wrong setup options.
Don’t worry. This step-by-step guide walks you through the full Shopify store setup. You’ll learn how to set up your account, list items, and get your first sales.
What You Need Before Starting a Shopify Store
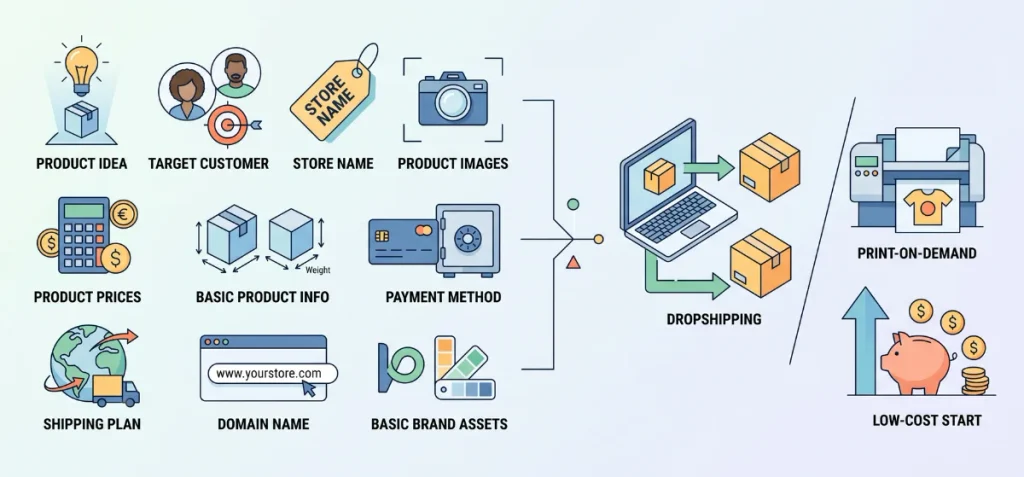
Gather key details before you set up your account. Preparation makes the build phase simple.
- Product Idea: Pick specific items to sell online.
- Target Customer: Define who buys your products and why.
- Store Name: Choose a short, catchy brand name.
- Product Images: Take clear photos of items on a plain backdrop.
- Product Prices: Determine your costs, markup, and final price points.
- Basic Product Information: Write down dimensions, weight, and key features.
- Payment Method: Set up a bank account to receive customer payouts.
- Shipping Plan: Decide where you ship and calculate delivery rates.
- Domain Name: Secure a custom web address for your store.
- Basic Brand Assets: Create a simple logo and select two primary hex colors.
Can You Start a Shopify Store with No Money?
You can’t run a live store completely free forever, but you can build one with very little cash. Shopify offers short free trials followed by low-cost promotional months, which gives you time to build.
However, you eventually need money for a custom domain name and standard plan renewals.
Zero-inventory models let you launch without buying product stock in advance. Dropshipping allows a third-party supplier to ship items straight to your buyer after a sale.
Print-on-demand creates custom apparel or goods only when an order comes through. Digital products like templates or files completely eliminate physical inventory costs. Hence, choose a business model that best fits you.
How to Start a Shopify Store Step by Step
Follow this clear setup path to build a fully functional store.
1. Create Your Shopify Account
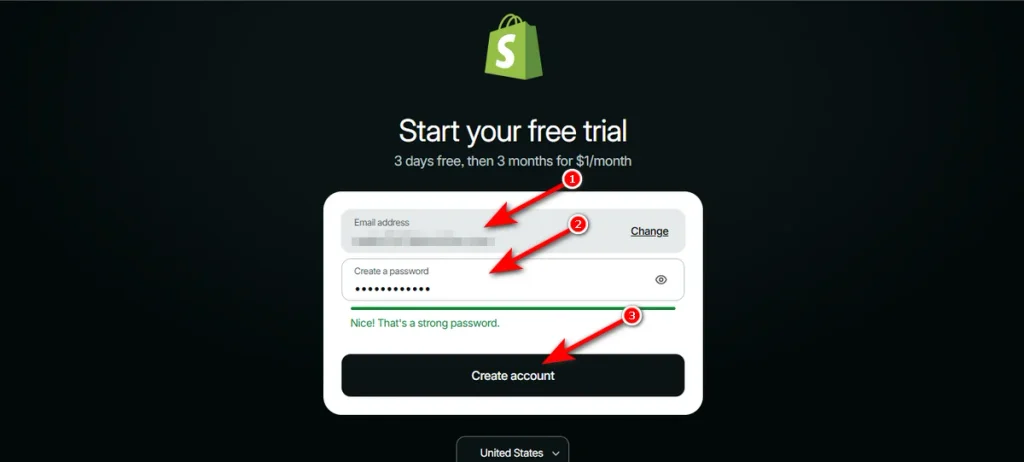
Visit the official website and click “Start for free” button at the top right.

Enter your email address and password and hit the “Create account” button.
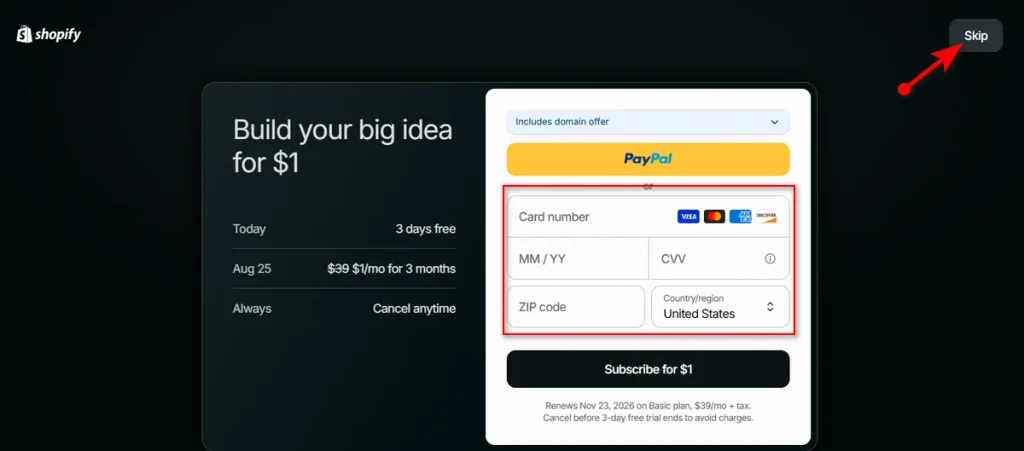
Now, you need to add your payment details. You can either add it now or skip it.
Select your store preferences and hit ‘Continue’ button.
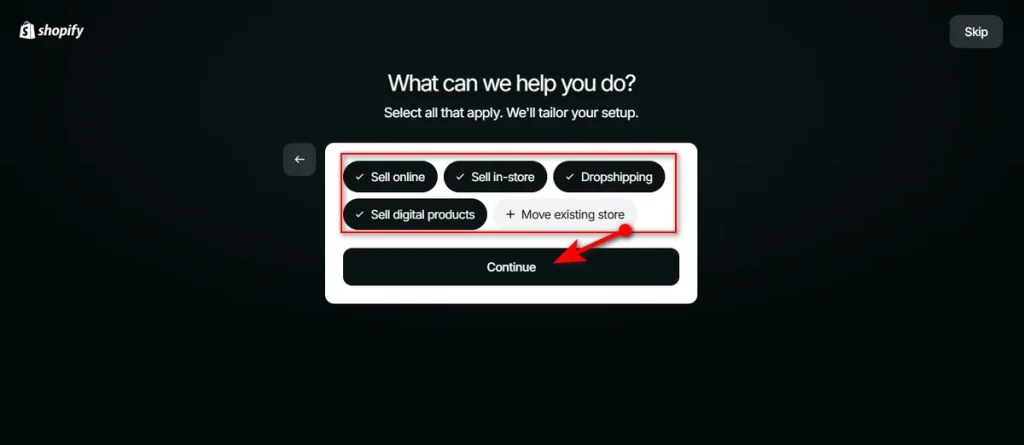
You’ll now enter Shopify Admin dashboard. This main hub lets you create a store, upload products, handle orders, and manage site settings.
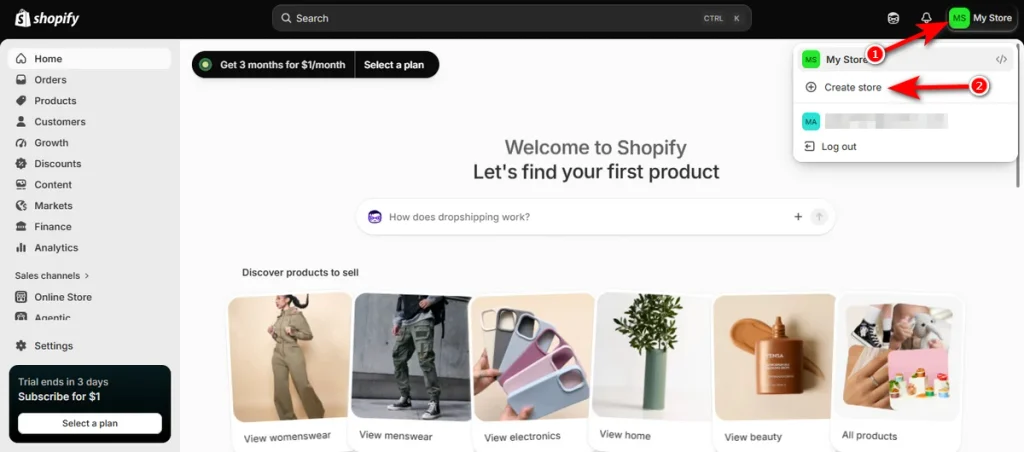
Note: Promotional pricing and trial terms change often. Verify current Shopify plans directly on their main site before publication.
2. Choose Your Store Name and Domain
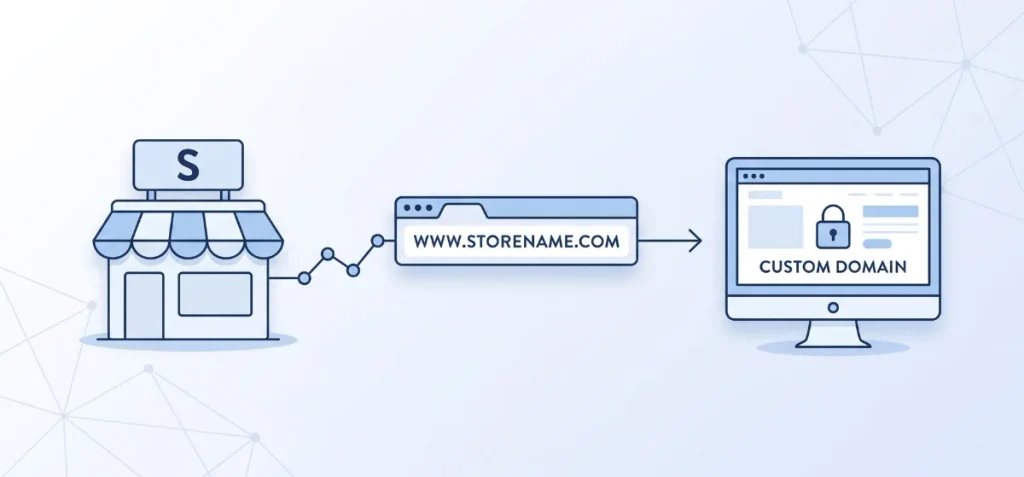
Your store name represents your business brand, while your domain name serves as your unique website address. Pick a short, memorable name so customers easily recall and type your web address.
Shopify gives you a default web address that ends in .myshopify.com during initial setup. Keep this address active while you build your store.
Purchase a custom domain directly through your dashboard or connect an existing domain from an outside provider before public launch.
3. Select and Customize a Shopify Theme
Select a visual layout inside your dashboard under the “Online Store” menu. Shopify Themes dictate how your store looks and functions.
Free templates work best for new store owners. The Dawn theme works as an excellent free option because it loads fast, looks clean, and adapts automatically to mobile screens.
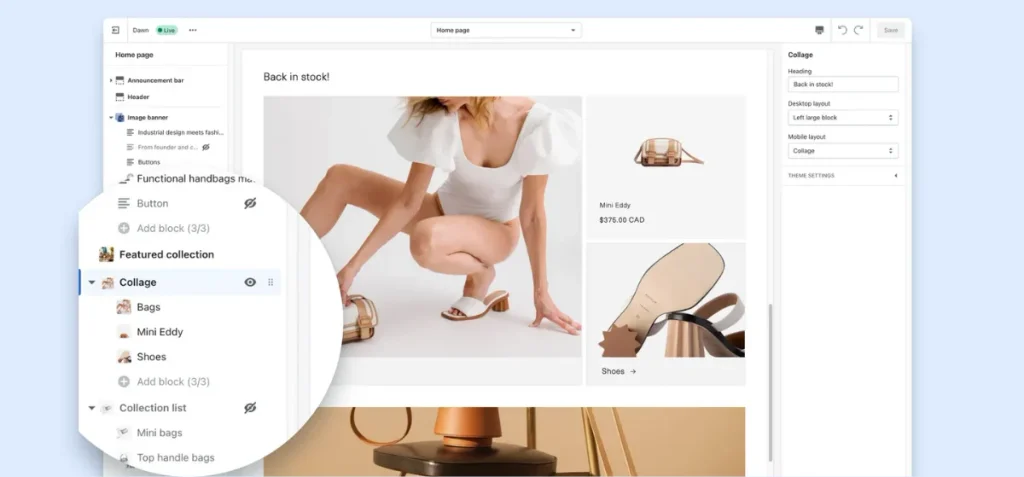
Image Source: Shopify Dawn Theme
Premium themes cost money, but you should save your capital for marketing until you validate your product sales.
Once you’ve picked and installed a theme, open the theme customizer to adjust these key elements:
- Logo: Upload a clear PNG image file of your brand mark.
- Colors and Fonts: Select primary brand colors and readable text styles.
- Homepage Sections: Arrange image banners, featured product grids, and promotional text blocks.
- Header and Navigation: Link main catalog categories to your top menu bar.
- Mobile Appearance: Toggle the editor view to verify layout rendering on smartphone screens.
4. Add Your Products
Go to your dashboard and click the ‘Products’ menu to add your items.
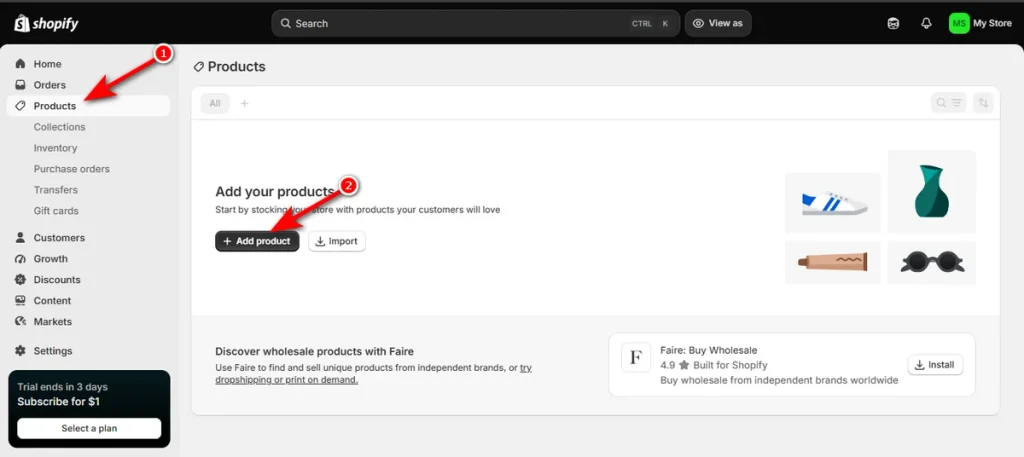
High-quality product photos, clear pricing, and persuasive descriptions directly drive sales conversions.
Use this simple framework for every item:
- Product Title: Write a clear, descriptive name.
- Product Description: Focus on customer benefits first, explaining how the item solves a problem rather than just listing features.
- Media: Upload sharp product photos on clean backgrounds or short demo videos.
- Price: Set the main selling cost.
- Compare-at Price: Show an original higher price to display a sale discount.
- Inventory: Input stock quantities and track available units.
- Variants: Add options for size, color, or material.
- SKU: Assign unique stock keeping units for internal tracking.
- Product Category/Type: Label the item to streamline site organization.
- Tags: Add descriptive keywords to help customers filter site search results.
5. Organize Products Into Collections
Shopify collections are product groups that help buyers browse your store.
Grouping products logically improves site navigation, reduces clicks, and helps visitors find exact items fast.
You can organize catalog inventory using two methods:
- Manual Collections: You hand-pick specific items for each category. This works well for small product catalogs or temporary sales.
- Automated Collections: You set condition rules based on tags, prices, or product titles. New items automatically join the right group when they match your conditions.
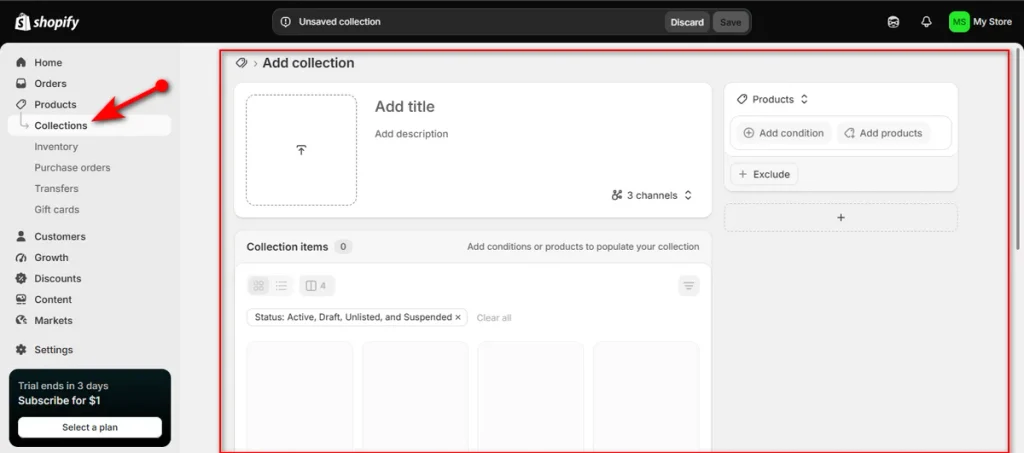
Create clear collections like ‘Men,’ ‘Women,’ “Best Sellers,” or “New Arrivals.”
Link these directly to your main navigation menu to give visitors a seamless shopping path.
6. Add the Essential Store Pages
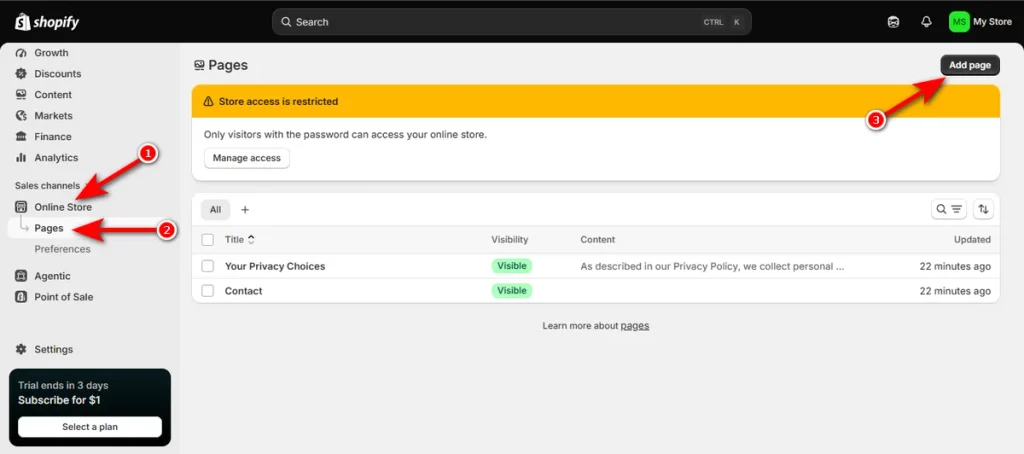
Shoppers look for clear information before they buy. Navigate to Online Store > Pages inside your dashboard and click “Add page” button to create the following pages:
- About Us: Share your story and brand mission.
- Contact: Provide a customer support email or a simple inquiry form.
- FAQ: Answer top questions about shipping times, sizing, and order handling.
Next, go to Settings > Policies at the bottom left of your admin panel to configure your legal documents:
- Policy Pages: Create official rules for shipping, returns, privacy, and terms of service.
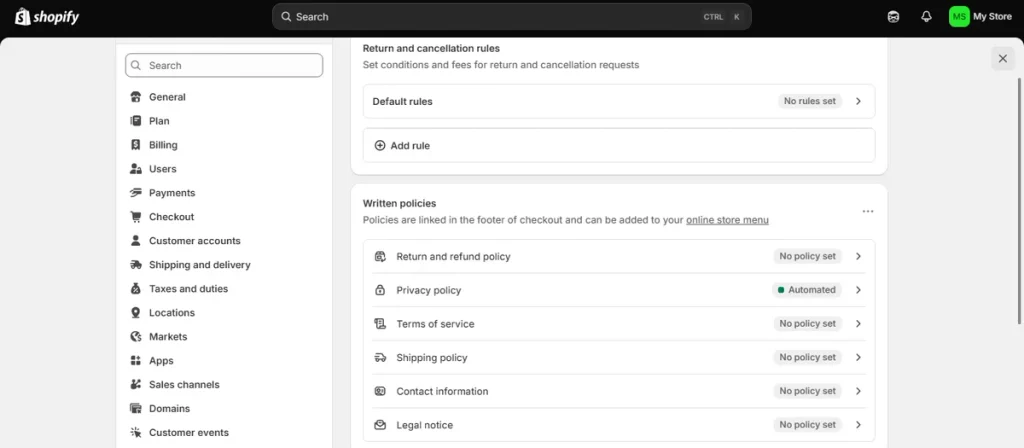
As you can see, Shopify provides built-in policy templates directly inside this legal panel. Auto-generate these documents as a starting base.
Customizing these fields ensures links display automatically across your footer and active checkout screens.
7. Set Up Payments, Shipping, and Taxes
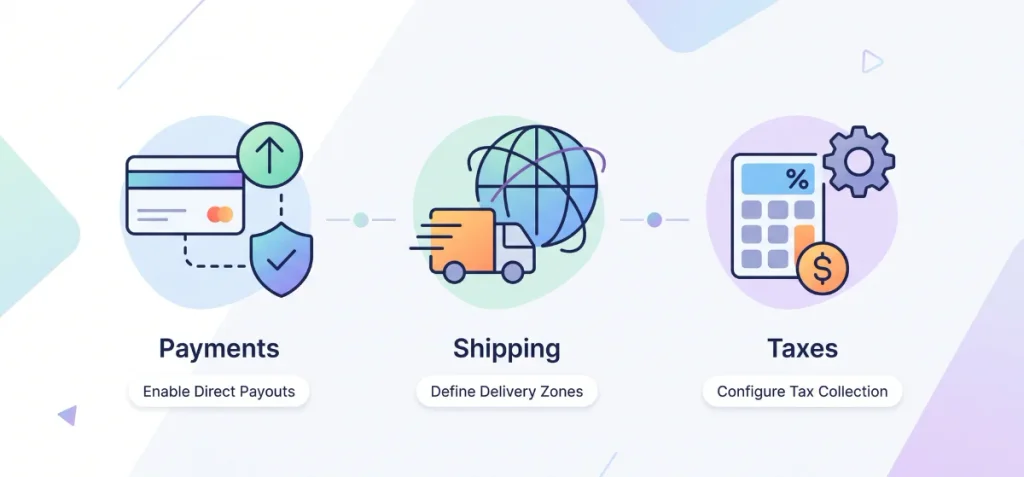
Configure core operational settings inside your dashboard before you open for business.
- Payments: Go to Settings > Payments to select payout options. Complete Shopify Payments setup to accept credit cards directly and avoid extra third-party transaction fees.
You can also connect third-party options like PayPal or Stripe. Review credit card processing fees for your specific account plan.
- Shipping: Open Settings > Shipping and delivery to define delivery rules. Set up geographic shipping zones for regions you want to serve.
Create flat delivery rates, real-time carrier quotes, or a free shipping threshold to encourage larger order sizes.
Enable local pickup or local delivery options if you manage local inventory.
- Taxes: Access Settings > Taxes and duties to configure regional tax collection. Select countries or states where you hold tax obligations.
Shopify calculates sales tax rates automatically at checkout based on your business location and customer address.
8. Customize Your Navigation and Storefront
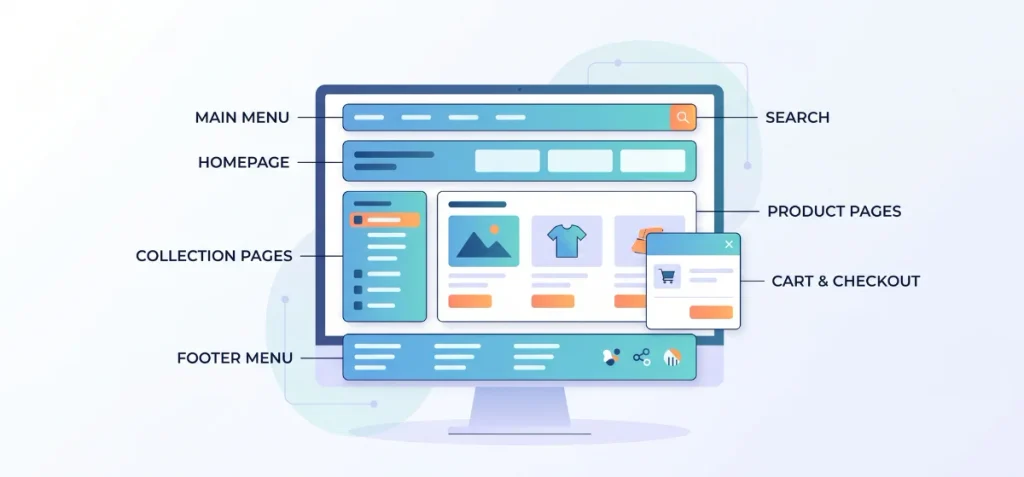
Build clear paths so visitors find items easily without getting lost.
- Main Menu: Link core product collections, best sellers, and your contact page to your top navigation bar.
- Footer Menu: Group policy links, terms, social icons, and your FAQ section in the footer menu.
- Search: Place a search icon in your top header so visitors can find specific items fast.
- Homepage: Arrange clean visual banners, featured collections, and a clear call to action at the top.
- Product Pages: Keep layouts clean with high-quality media, clear price tags, and visible add-to-cart buttons.
- Collection Pages: Use clear collection titles and simple sorting filters to help buyers browse smoothly.
- Cart and Checkout: Keep cart drawer preview screens simple and keep checkout steps brief to minimize abandoned orders.
9. Test Your Shopify Store Before Launch
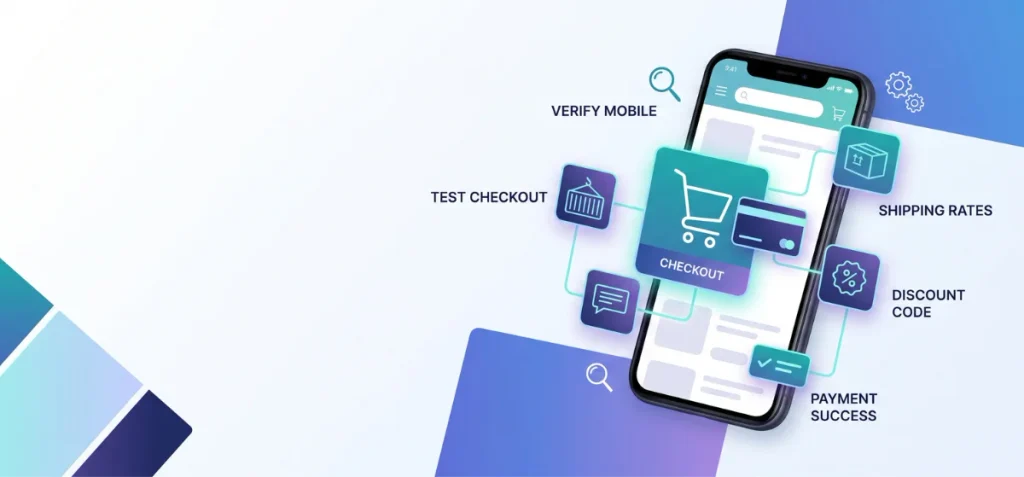
Run through this complete pre-launch checklist to catch broken links and setup errors before real customers visit your site.
- Open your site on a mobile phone to check responsive layouts.
- Click every link across your top header and footer menus.
- Add a product to your shopping cart.
- Place a test order to verify the full checkout workflow.
- Confirm payment processor settings work without errors.
- Verify shipping rate calculations at checkout.
- Apply test discount codes to ensure price reductions update correctly.
- Confirm automated order confirmation emails arrive in your inbox.
- Submit an inquiry through your contact form to test message delivery.
- Proofread product descriptions for correct pricing and accurate specs.
10. Launch Your Shopify Store
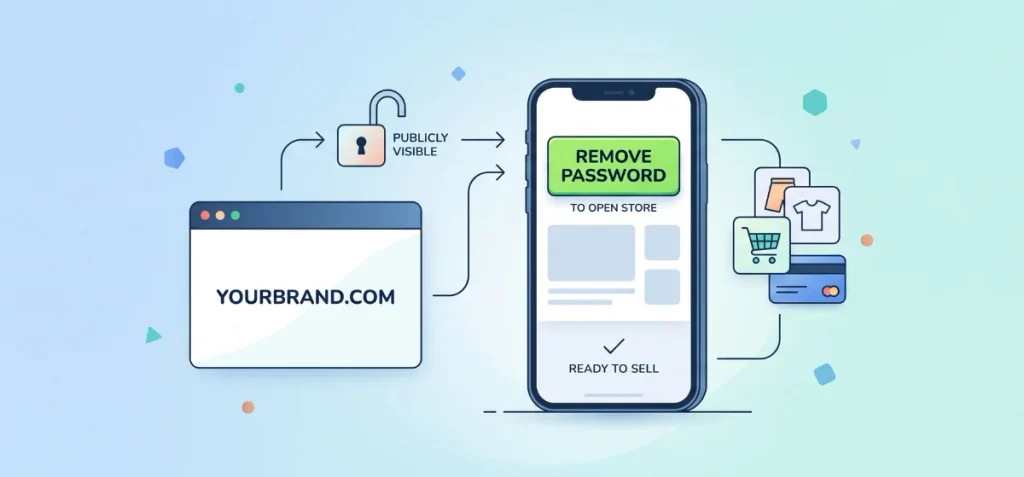
Make your storefront live to the public once your pre-launch checklist passes.
- Connect Custom Domain: Set your primary domain in settings so visitors see your branded web address.
- Check Store Visibility: Verify that all layout pages and media assets render properly.
- Confirm Product Availability: Ensure active status toggles show products as available across your online store channel.
- Remove Password Protection: Navigate to “Online Store” in your left sidebar menu.
Locate the online store status card at the top of the Overview screen and click the “Remove password” button.
This action removes the coming-soon banner and opens your store to public buyers immediately.
How to Get Your First Shopify Customers
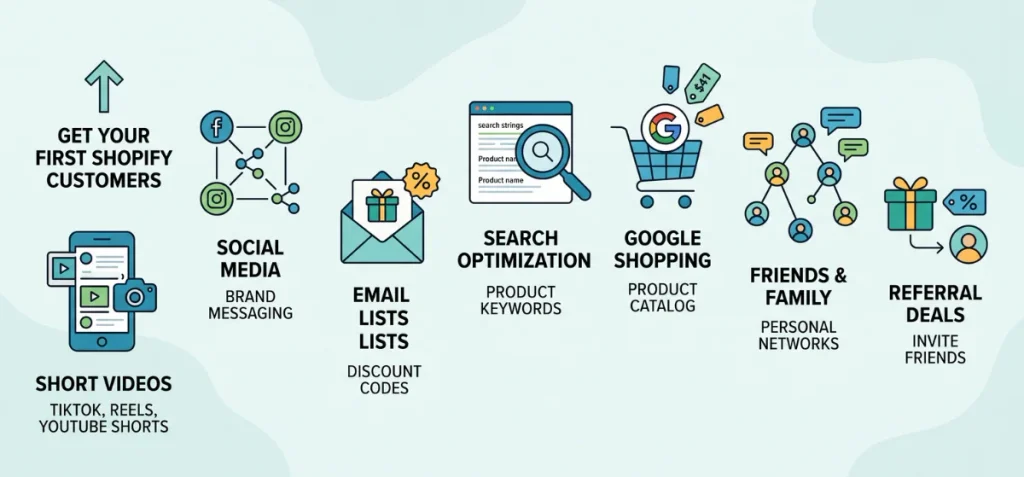
A live store doesn’t make sales by itself. Opening your site is just step one. You must invite people to visit your store.
Try these quick ways to bring real shoppers to your site:
- Short Videos: Post fun clips on TikTok, YouTube Shorts, and Instagram Reels. Show how your products work in real life.
- Social Media: Share posts on Facebook and Instagram to show off your brand values and items.
- Email Lists: Ask visitors for their email addresses. Send them discount codes and product updates.
- Search Engine Optimization: Add clear search keywords to your product titles. This helps search engines show your store to active buyers.
- Google Shopping: Connect your product catalog to Google so your items show up in direct shopping search results.
- Friends and Family: Tell your personal social groups about your launch. Ask friends to share links with their personal circles.
- Referral Deals: Give buyers a discount code when they invite their best friends to shop with you.
Common Shopify Store Mistakes to Avoid
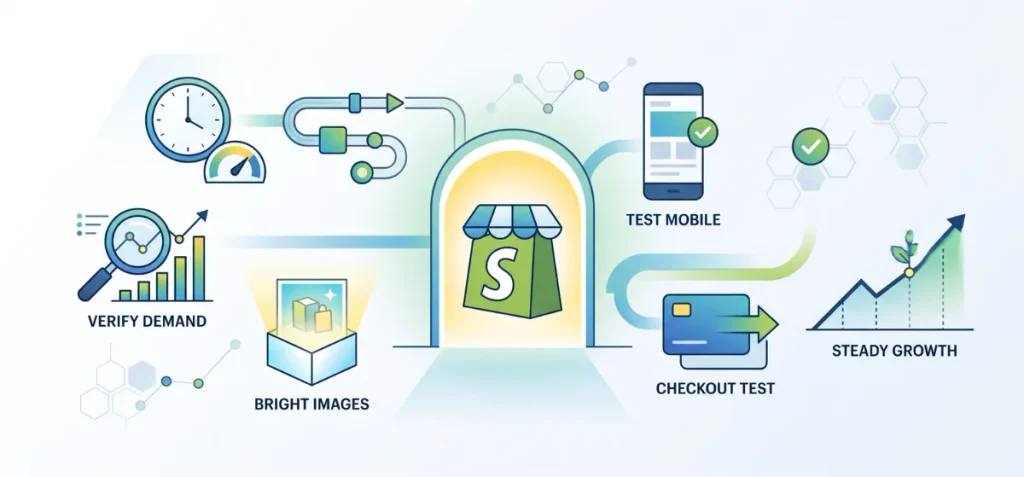
Avoid these quick traps when you set up your online shop:
- Skipping Product Research: Always check buyer demand before you stock items. Selling goods without active interest wastes time and money.
- Using Dark Photos: Clear, bright photos build fast customer trust. Blurry or dark images push buyers away instantly.
- Installing Too Many Apps: Excess app downloads slow down your web pages. Keep your setup light and fast.
- Ignoring Mobile Views: Most shoppers buy goods on smartphones. Always test how your layout looks on smaller screens.
- Skipping Checkout Tests: Broken payment buttons kill sales fast. Place a test order before public launch.
- Expecting Instant Success: Real sales take consistent effort and steady marketing. Build trust step by step instead of waiting for overnight wins.
Shopify Store Setup Checklist
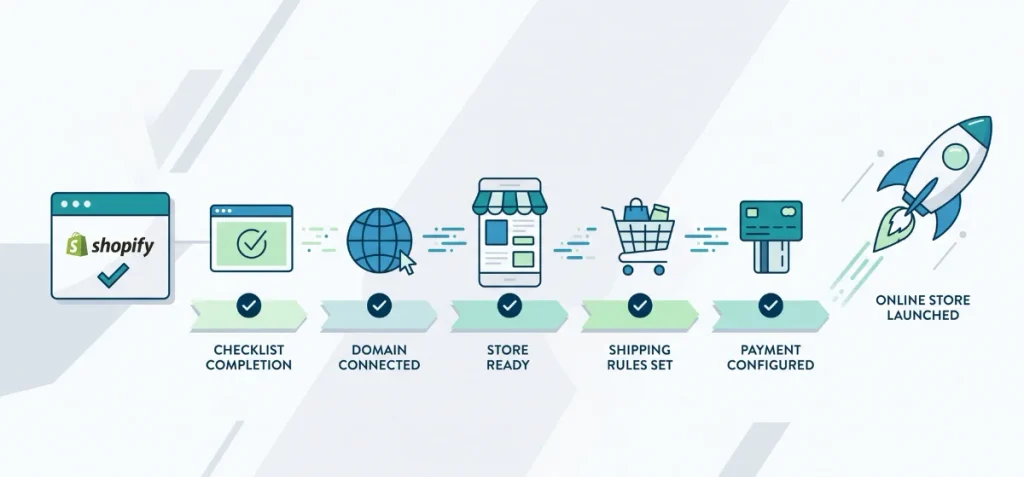
Use this fast checklist to verify every core setup step before you launch your shop to public buyers.
- Shopify account created.
- Store name chosen.
- Custom domain connected.
- Theme layout customized.
- Products uploaded with photos.
- Product collections created.
- Essential pages published.
- Payment provider configured.
- Shipping rules set.
- Regional taxes reviewed.
- Store layout tested on mobile.
- Test checkout completed.
- Password protection removed.
- Online store launched.
Be an Owner of a Shopify Store
You now know how to start a Shopify store with confidence. Take action today and turn your business idea into reality.
Ecommerce rewards action over perfection. Focus on your first product, build a clean layout, and launch fast.
You can make continuous site improvements after your store goes live. Wishing you good luck on your ecommerce journey.
FAQs
How Much Does It Cost to Start a Shopify Store?
A basic plan plus domain costs around $44 to start. Total costs vary based on inventory, apps, and marketing. Check Shopify’s official site for current plan pricing.
How Much Does Shopify Take from a $100 Sale?
Shopify takes about $2.80 to $3.20 using Shopify Payments. Total fees depend on your plan tier and third-party payment gateway choices.
Do I Need an LLC to Run a Shopify Store?
No, Shopify doesn’t require an LLC. You can register as a sole proprietor. Local legal requirements depend on your location and business setup.
What Sells Fast on Shopify?
Apparel, skin care, makeup, and wellness items sell fast. High demand, strong product benefits, clear target audiences, and solid margins drive quick store sales.
Can I Start a Shopify Store Without Inventory?
Yes. You can use dropshipping, print-on-demand, or sell digital downloads. Third-party suppliers or automatic file links handle product delivery after every customer sale.